RV roof replacement may be necessary if you’ve let the wood
rot over time. If you’re considering
replacing your RV’s roof, you’re likely looking at a roof that is musty and
distinctly
weak in appearance. That
simply won’t do if you want to continue to get the most out of your RV. Fortunately,
all hope is not lost. With this RV roof replacement guide and the proper
application of the right tools, you can replace your roof and prevent further
wood rot prevention. Here’s how.
Part 1 – RV Roof
Replacement Guide
![]()
![]()
RV roof replacement might sound like an impossibly tall
task, but remember that we’re talking RVs here—not residential homes. Even so,
there are a few things you’ll want to keep in mind before starting:
- Make sure you can’t seal off part of the roof to
fix the problem. Replacing the entire roof can take a while, but using an
RV sealant can be done much
more quickly. - For rot that occurs only in spots, consider
using this
“Git-Rot”
RX for Dry Rot Pint Kit
. More on that in section two of this guide. - Remember to adhere to proper safety precautions.
Clear out a site, wear protective gear, and always make sure that everyone else
stands clear of where you’re working.
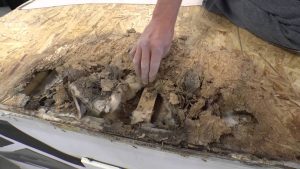
RV roof replacement begins by removing the old roof. If you
have a lot of water damage, this might be done more piecemeal than you expected.
Do your best to figure out what materials you’re dealing with. Remove all
rooftop objects like air conditioning units and antennas. Sometimes used RVs
can offer more surprises than you bargained for when it comes to the roofing.
Work slowly at first, ensuring that you understand the RV roof replacement
process. And if you can’t do it by yourself, it may be time to call a
specialist.
Once the rotted roof is removed, make sure you have
arrangements made for proper disposal. A specialist can take care of that for you
if needed.
Install the new roof, usually with a rubber membrane first.
You can then install the components from the rooftop that you removed earlier
on in the process. Check the area for a watertight seal and clean the area of
debris. Be sure to use
RV
sealant
to help ensure your RV roof replacement will be protected from
future rot.
![]()
![]()
Part 2 – Preventing Future
Wood Rot
The best way to avoid having to go through the arduous
process of RV roof replacement is to prevent wood rot before it occurs. Here
are a few basic tips before you switch to using a kit:
- Regularly inspect your RV roof and wood for
“trouble” spots. The earlier you identify wood rot, the better a chance you
have at tackling it. - Keep your RV well-sealed and dry. Improper
sealing can lead to long-term “chronic” problems that are difficult to
identify. - Clean and dry your RV regularly, especially in
joints and openings, to ensure that the wrong debris isn’t getting through.
If you do see some wood rot setting in, use
Git-Rot.Make sure you’re working with dry wood
first, then apply the liquid epoxy. This liquid epoxy can penetrate the wood
and help restore its original strength.
Dealing with an RV roof full of rotted wood is no one’s idea
of a fun afternoon. But if you take the proper steps—whether it means roof replacement
or wood rot prevention—you’ll be far more likely to have success. Then you can
get back to enjoying a dry, comfortable RV once again.